


If you are worried about high WSAPPX CPU , this article explains how to overcome it. We will explain several methods to solve this problem, including a professional solution called EaseUS Partition Master.
WSAPPX is a process found in the Windows operating system. The Task Manager process in Windows PC will display this process. Many Windows users often pay attention to this process, not least because of the heavy CPU usage associated with it. The amount of CPU usage associated with WSAPPX usually varies randomly. This means that the amount of CPU usage for this process increases and decreases randomly.
You can extend the WSAPPX process simply by double-clicking it. After that you can see two other processes namely ClipSVC (WSService in Windows 8) and AppXSVC. In addition to this, Task Manager can display WSAPPX in multiple instances in its process list.
PS: here you can read more about What Is Distinguished and how to fix high WmiPrvSE.exe CPU with ease.
What is WSAPPX exactly?
Table of Contents
In fact, WSAPPX is a system process that was originally found in the Windows 8 version. It is now also available in other (newer) versions of Windows. WSAPPX runs as a background process and also works with Windows Universal Apps and Windows Store. These services are basically used to update a particular Windows application or even to check the license.
Should you treat the high WSAPPX processor as a serious problem?
In simpler terms, WSAPPX is not something you should worry about. It is nothing but a Windows process running in the background. This process is available in Windows 8 and Windows 10. In addition, to our knowledge, there is now malware under the name of WSAPPX. So what we need to tell you is that you don’t need to treat WSAPPX as a threat. It is a perfectly normal process that runs in all versions of Windows above Windows 8.
Why does WSAPPX use high CPU capacity?
The main concern of users who notice WSAPPX is that its high CPU usage. Just like we mentioned before, CPU usage decreases and sometimes increases randomly. Users are worried when they see that CPU usage is increasing significantly. You may experience a high WSAPPX processor each time you install a Windows application or install a new one. Indeed, WSAPPX is directly linked to the Windows Store.
In many cases, however, the CPU usage of this program remains low. It peaks every time you update an app or install an app. Even if you try to stop WSAPPX, you cannot necessarily do so from Windows services. When you try to do this, you will receive a message stating that it also affects other applications. If you try to complete the process from Task Manager, you will see a message containing similar information. But that does not mean that you cannot deactivate the process at all. For those who don’t want to use Windows Apps and stay away from the WSAPPX processor, there is good news. There are two practical methods for doing this. If you are the one of these users, these methods are mentioned below for reference. You can try all of these methods and see which option can stop WSAPPX and make it easier for the processor. In addition to the default methods, we are revealing a professional solution called EaseUS Partition Master.
- Method 1: Try to deactivate the Windows Store
- Method 2: Disable the Windows Store Using Registry Editor
- Method 3: Try Disabling Superfetch and Windows Search
- Method 4. Use EaseUS Partition Master to fix the elevated WSAPPX processor
Method 1: Try to deactivate the Windows Store
First, let’s see how to fix the WSAPPX high processor issue by disabling the Windows Store on your phone. Please note that this method does not completely stop WSAPPX. The program will still run in the background after disabling the Windows Store. But WSAPPX will not have a significant impact on the processor when the Windows Store is deactivated.
As you already know, WSAPPX is directly linked to the Windows Store. It uses IT resources to install, update or perform any other task associated with the Windows Store. Thus, by deactivating the Windows Store, we intend to break the link between the Windows Store and WSAPPX. As a result, WSAPPX will operate using a negligible amount of CPU capacity.
To deactivate the Windows Store services, however, there is a special method to follow. You can’t do it like you would with other services. Well, in this case we have to use the option “Local Group Policy Editor”.
The problem here is that you can’t just deactivate the Windows Store from services, as you normally would with other services. We will therefore have to use the local group policy editor.
Here are the steps to deactivate the Windows Store through the local Group Policy Editor.
In Windows 10, you need to follow the steps mentioned below.


- Press and hold the Windows key and press “R”.
- Enter the command gpedit.msc and press “Enter”.
- You will now see a new window.
- Go to Computer Configuration, Administrative Templates and select Windows Components.
- Then select the “Store” option.
If it is still difficult for you, please follow the steps detailed below.
- Double-click on the “Computer configurations” option located in the left pane
- Double-click on the “Administrative Templates” option located in the left pane
- Then, double-click on the “Windows Components” option located in the left pane
- Then you have to click on the option labeled “Store” in the left pane
- You can then double-click on the option entitled “Deactivate the Store application”
- You must select the activated option and click on Apply
- Press OK to complete the process
You can now restart your computer and start working.
For Windows 8 and 8.1 users
You will not be able to find the Local Group Policy Editor on the Professional and Enterprise editions of Windows. So if you are using one of these editions, you have to approach the process from a different path. In this case, we will use the registry function. Please follow the steps mentioned below if you need to deactivate the Windows Store via the Windows registry.


- Press and hold the Windows key and press the “R” key to open the RUN command.
- Enter Regedit and press “Enter”.
- Now you will notice an open window.
- On this window, on the left panel, you must follow the path mentioned below.
HKEY_LOCAL_MACHINE \ SOFTWARE \ Policies \ Microsoft \ WindowsStore.


- Find the “HKEY_LOCAL_MACHINE” option located in the left pane and double-click it.
- Look for the “SOFTWARE” option located in the left pane and double-click it.
- And then find the “Policies” option located in the left pane and double-click it.
- Find the “Microsoft” option located in the left pane and double-click it.
- You can then locate and click on the “WindowsStore” option in the left pane. If you cannot find an option called “WindowsStore”, you will need to create a new folder. Make sure to rename this new folder to “WindowsStore”.
- To create a new folder, right-click the Microsoft folder located in the left pane.
- Select the New option, then go to Key.
- Then enter the name “WindowsStore” and press Enter.
- Type the name WindowsStore and press Enter.
- You can now select “WindowsStore” in the left pane.
- Right-click again on an empty area in the right pane and select “New”.
- Then select the option “DWORD value (32 bit)
- Then you need to name the entry you just created as “RemoveWindowsStore” and press Enter
- You can now double-click on the entry that has just been created
- Enter “1” in the saved value data and press Enter
- Right now your Windows Store should be disabled
Method 2: Disable the Windows Store Using Registry Editor
Here is another method to consider to deactivate the Windows Store on your computer.


- Press and hold the Window key, then press “R”.
- Once you are prompted for the “Run” menu, simply type “regedit” and press Enter.
- Go to “HKEY_LOCAL_MACHINE \ SOFTWARE \ Microsoft \ Windows NT \ CurrentVersion \ SvcHost”.
- Do not worry if you do not know how to visit this path. You can try the steps mentioned below instead.
- Double-click on the “HKEY_LOCAL_MACHINE” option located in the left pane
- Double-click on the “SOFTWARE” option located in the left pane
- And then double-click on “Microsoft” located in the left pane
- Double-click on the “Windows NT” option located in the left pane
- Double-click on the “CurrentVersion” option located in the left pane
- Then click on the option titled “SvcHost”
- You can now double-click on the string entitled “WSAPPX” in the right pane
- When the new window appears, you should be able to see two entries (clipsvc and AppXSvc). You must change these entries to “NotFound” and “AppXSvc” respectively.
- You can now press OK and restart the computer
Method 3: Try Disabling Superfetch and Windows Search
If you cannot resolve the problem, you can also try this option. While this method may only work for some users, it is worth trying when nothing else works.


- Go to “Run” by holding down the Windows key and pressing R.
- Then you need to type services.msc and press Enter.
- Then, you must double-click on the “Superfetch” option in the list displayed.
- You can then select “Disabled” from the drop-down list that appears (under Startup type).
- Click Apply and select OK
- Close the (Superfetch Properties) window and double-click Windows Search
- Choose the option “Disabled”
- Click Stop if the service is running
- Click Apply and press OK
Method 4. Use EaseUS Partition Master to fix the elevated WSAPPX processor
As a Windows computer user, you should try a disk check and get rid of all the unnecessary files. To achieve this, we recommend that you use a third-party tool. The best tool we can rely on is EaseUS Partition Manager . It is a free partition tool that works without problems on any Windows PC. Here’s how to do it using EaseUS Partition Master.
a) Download and install EaseUS Partition Master on the computer with the WSAPPX problem.
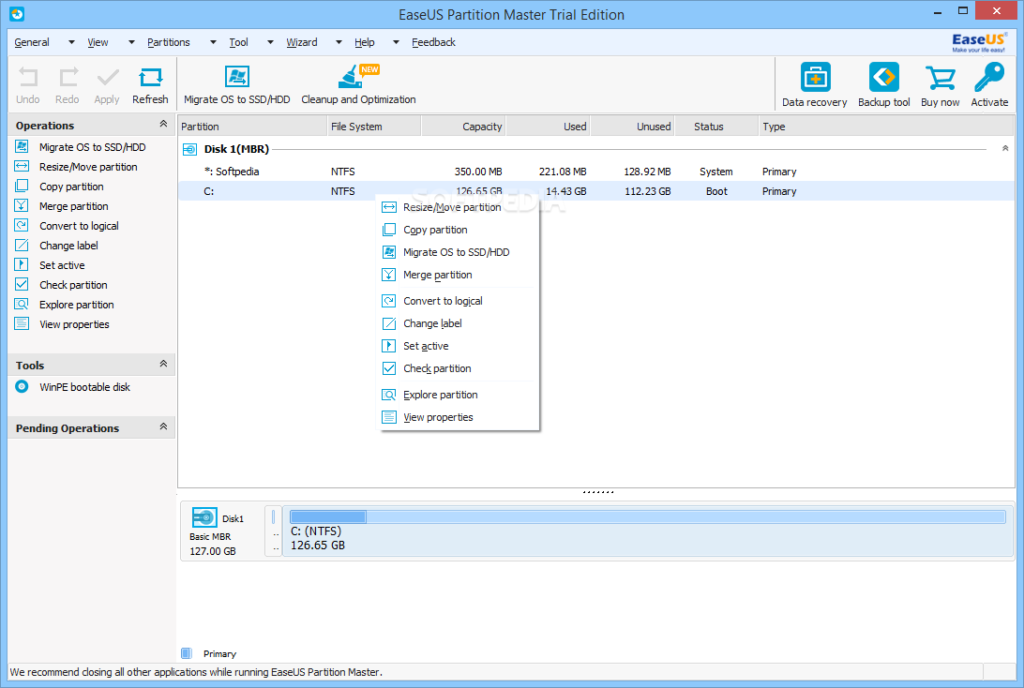
b) Launch the program and locate the disk. Then right click on the partition where your operating system is installed. In most cases, it should be ” C “.
c) Then choose the option ” Check the file system “.

d) Make sure that ” Try to correct the errors if they are found ” is selected in the “Check the file system” window.

e) Click on the ” Start ” option .
f) Now the software will start checking the file system. Once the process is complete, you can click ” finish “.

g) Next, start cleaning up junk files after checking for potential disk errors. After completing all of these steps, you can restart the computer.
As a final step, you can access the Task Manager and check if WSAPPX is working normally.
Source: istartips.com
Be the first to write a comment.